KubeSphere-01-介绍与基础使用
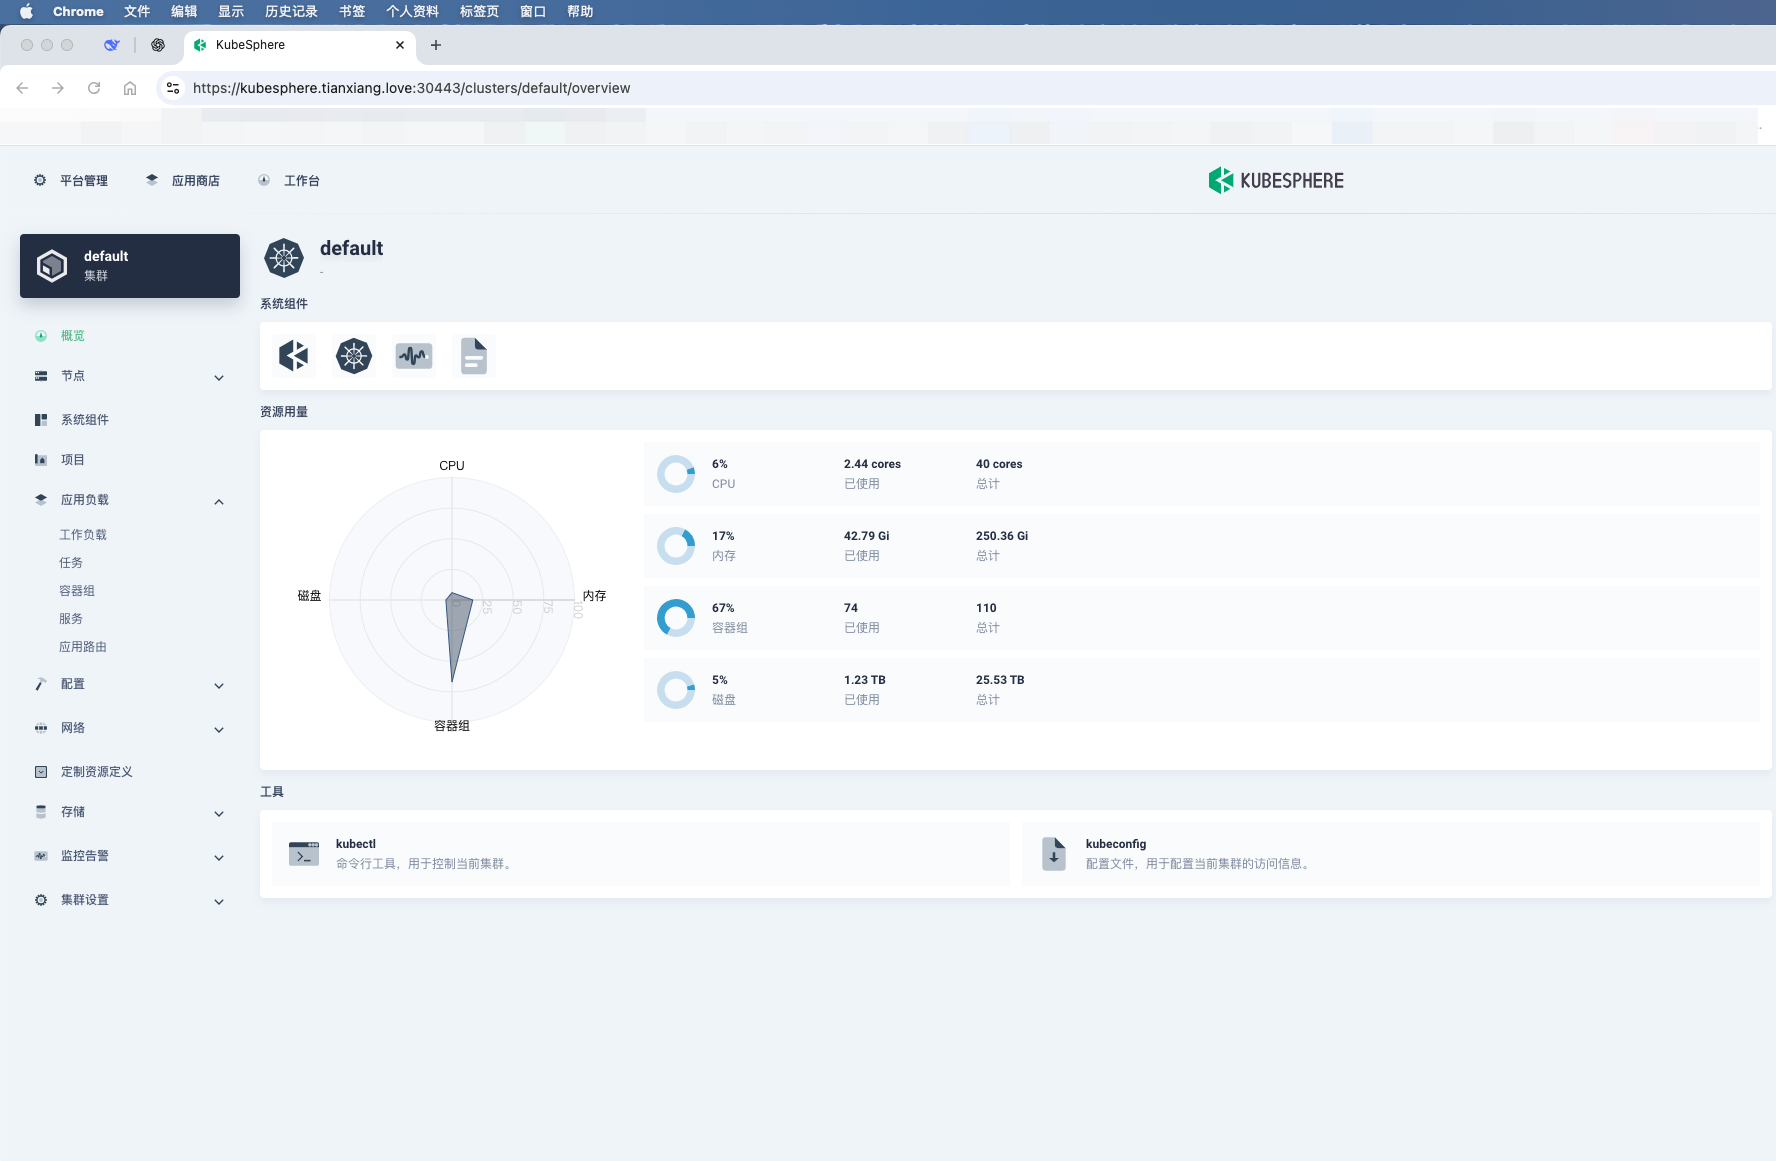
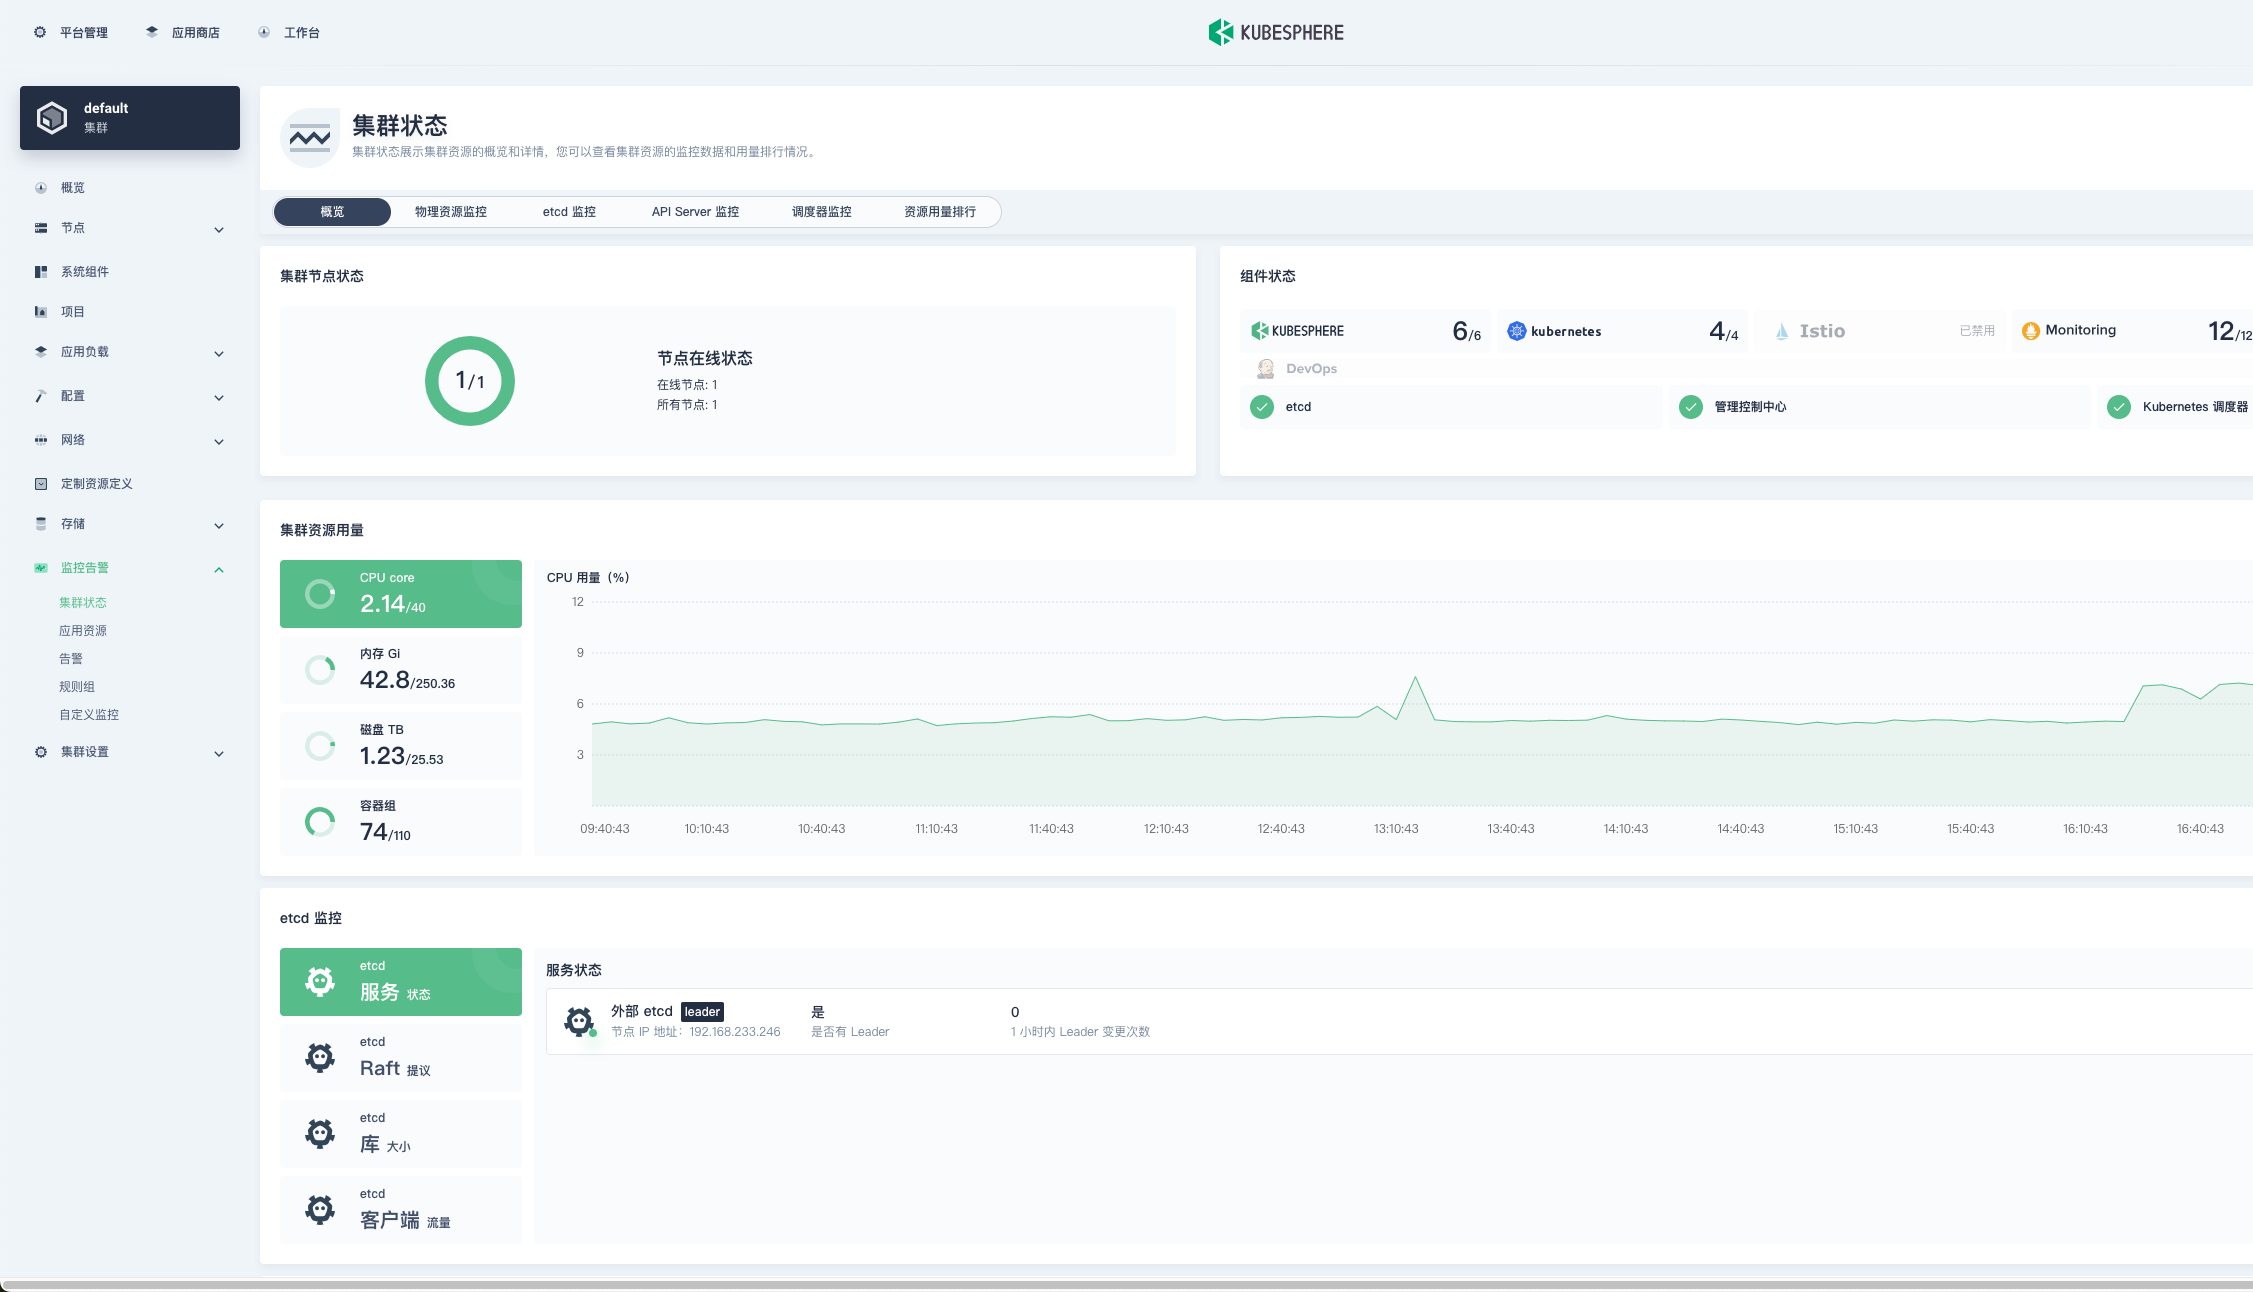
KubeSphere 是一个基于 Kubernetes 的分布式多租户容器管理平台,它本质上是一个 Kubernetes 的 上层 PaaS(容器平台),为企业提供了更友好的图形化管理和一整套开箱即用的功能。
一、核心特性:
图形化界面
通过 Web 控制台可以可视化管理 Kubernetes 集群、工作负载、服务、存储、网络等,不必频繁写 YAML 或命令行。
多租户与 DevOps
内置 多租户隔离机制,支持企业级权限和工作空间管理。
内置 CI/CD 流水线(基于 Jenkins),支持 GitOps、代码构建、镜像推送和应用部署。
应用管理
提供 应用商店(App Store),支持 Helm Chart 和 Operator 部署。
支持微服务治理(基于 Istio),流量管理、灰度发布、可观测性。
可观测性
集成 监控(Prometheus + Grafana)、日志(Elasticsearch + Fluentbit + Kibana)、告警(Alertmanager)。
支持集群、节点、Pod、服务级别的监控。
多集群管理
一套控制台管理多个 Kubernetes 集群,支持跨集群调度与统一监控。
扩展能力
模块化架构,可以根据需求启用 DevOps、服务网格、多集群、可观测性等功能。

二、适用场景:
企业级 Kubernetes 管理,降低使用 Kubernetes 的门槛。
需要 CI/CD、微服务治理、日志监控、权限多租户的环境。
中小企业快速搭建 DevOps 平台,避免重复造轮子。
👉 可以理解为:Kubernetes 是“发动机”,KubeSphere 是“整车和仪表盘”。
三、配置讲解
KubeSphere 使用 ClusterConfiguration CRD 管理安装配置。通过编辑该配置,可以启用/禁用内置组件,或与外部系统集成。以下为逐块解读。
1. 基本信息
apiVersion: installer.kubesphere.io/v1alpha1
kind: ClusterConfiguration
metadata:
  name: ks-installer
  namespace: kubesphere-system
  labels:
    version: v3.4.1
spec:
  persistence:
    storageClass: "nfs-provisioner-storage"        # 如果集群中没有默认的 StorageClass,需要在这里指定一个已存在的 StorageClass。
  authentication:
    adminPassword: "P@88w0rd"     # 管理员用户的自定义密码。如果参数存在但值为空,则会随机生成密码;如果参数不存在,则默认使用 P@88w0rd。
    jwtSecret: ""           # 必须保持与主集群的 jwtSecret 一致。可通过以下命令获取:kubectl -n kubesphere-system get cm kubesphere-config -o yaml | grep -v "apiVersion" | grep jwtSecret
  local_registry: "harbor.tianxiang.love:30443"        # 如果需要,可在此处添加私有镜像仓库地址。
#  dev_tag: ""               # 指定要安装的 KubeSphere 镜像标签,默认与 ks-installer 的版本一致。
  etcd:
    monitoring: true       # 启用或禁用 etcd 监控仪表板安装。启用前必须先为 etcd 创建 Secret。
    endpointIps: "192.168.198.51"  # etcd 集群端点 IP 地址。可以在此处填写多个 IP。
    port: 2379              # etcd 端口。
    tlsEnable: true
    caFile: "/etc/prometheus/secrets/kube-etcd-client-certs/etcd-client-ca.crt"
    certFile: "/etc/prometheus/secrets/kube-etcd-client-certs/etcd-client.crt"
    keyFile: "/etc/prometheus/secrets/kube-etcd-client-certs/etcd-client.key"
  common:
    core:
      console:
        enableMultiLogin: true  # 启用或禁用同时登录。它允许不同用户同时使用同一账户登录。
        port: 30880
        type: NodePort
      apiserver:            # 为大型集群扩大 apiserver 和 controller manager 的资源请求和限制
        resources:
          requests:
            memory: "1Gi"
            cpu: "500m"
          limits:
            memory: "4Gi"
            cpu: "2"
      controllerManager:
        resources:
          requests:
            memory: "1Gi"
            cpu: "500m"
          limits:
            memory: "4Gi"
            cpu: "2"
    redis:
      enabled: true
      enableHA: false
      volumeSize: 100Gi # Redis PVC 大小。
    openldap:
      enabled: true
      volumeSize: 20Gi   # openldap PVC 大小。
    minio:
      volumeSize: 200Gi # Minio PVC 大小。
    monitoring:
      #type: external   # 是否指定外部 prometheus 堆栈,需要在下一行修改端点。
      endpoint: http://prometheus-operated.kubesphere-monitoring-system.svc:9090 # 用于获取指标数据的 Prometheus 端点。
      GPUMonitoring:     # 启用或禁用 GPU 相关指标。如果启用此开关但没有 GPU 资源,Kubesphere 会将其设置为零。
        enabled: false
    gpu:                 # 安装 GPU 种类。默认 GPU 种类是 nvidia.com/gpu。可以根据需要在此处添加其他 GPU 种类。
      kinds:
      - resourceName: "nvidia.com/gpu"
        resourceType: "GPU"
        default: true
    es:   # 用于日志记录、事件和审计的存储后端。
      # master:
      #   volumeSize: 4Gi  # Elasticsearch 主节点的卷大小。
      #   replicas: 1      # 主节点总数。不允许偶数。
      #   resources: {}
      # data:
      #   volumeSize: 20Gi  # Elasticsearch 数据节点的卷大小。
      #   replicas: 1       # 数据节点总数。
      #   resources: {}
      enabled: false
      logMaxAge: 7             # 内置 Elasticsearch 中的日志保留时间。默认为 7 天。
      elkPrefix: logstash      # 构成索引名称的字符串。索引名称将格式化为 ks-<elk_prefix>-log。
      basicAuth:
        enabled: false
        username: ""
        password: ""
      externalElasticsearchHost: ""
      externalElasticsearchPort: ""
    opensearch:   # 用于日志记录、事件和审计的存储后端。
      # master:
      #   volumeSize: 4Gi  # Opensearch 主节点的卷大小。
      #   replicas: 1      # 主节点总数。不允许偶数。
      #   resources: {}
      # data:
      #   volumeSize: 20Gi  # Opensearch 数据节点的卷大小。
      #   replicas: 1       # 数据节点总数。
      #   resources: {}
      enabled: true
      logMaxAge: 7             # 内置 Opensearch 中的日志保留时间。默认为 7 天。
      opensearchPrefix: whizard      # 构成索引名称的字符串。索引名称将格式化为 ks-<opensearchPrefix>-logging。
      basicAuth:
        enabled: true
        username: "admin"
        password: "admin"
      externalOpensearchHost: ""
      externalOpensearchPort: ""
      dashboard:
        enabled: true
  alerting:                # (CPU: 0.1 核, 内存: 100 MiB) 使用户能够自定义告警策略,以不同的时间间隔和告警级别及时向接收器发送消息。
    enabled: true         # 启用或禁用 KubeSphere 告警系统。
    # thanosruler:
    #   replicas: 1
    #   resources: {}
  auditing:                # 提供与安全相关的按时间顺序的记录集,记录平台上由不同租户发起的一系列活动。
    enabled: true         # 启用或禁用 KubeSphere 审计日志系统。
    # operator:
    #   resources: {}
    # webhook:
    #   resources: {}
  devops:                  # (CPU: 0.47 核, 内存: 8.6 G) 提供基于 Jenkins 的开箱即用 CI/CD 系统,以及包括 Source-to-Image 和 Binary-to-Image 的自动化工作流工具。
    enabled: true         # 启用或禁用 KubeSphere DevOps 系统。
    jenkinsCpuReq: 0.5
    jenkinsCpuLim: 4
    jenkinsMemoryReq: 6Gi
    jenkinsMemoryLim: 6Gi  # 建议与 requests.memory 保持一致。
    jenkinsVolumeSize: 160Gi
  events:                  # 为多租户 Kubernetes 集群中的 Kubernetes 事件导出、过滤和告警提供图形化 Web 控制台。
    enabled: true         # 启用或禁用 KubeSphere 事件系统。
    # operator:
    #   resources: {}
    # exporter:
    #   resources: {}
    ruler:
      enabled: true
      replicas: 2
    #   resources: {}
  logging:                 # (CPU: 57 m, 内存: 2.76 G) 在统一控制台中提供灵活的日志查询、收集和管理功能。可以添加其他日志收集器,如 Elasticsearch、Kafka 和 Fluentd。
    enabled: true         # 启用或禁用 KubeSphere 日志系统。
    containerruntime: docker
    logsidecar:
      enabled: true
      replicas: 2
      # resources: {}
  metrics_server:                    # (CPU: 56 m, 内存: 44.35 MiB) 启用 HPA(水平 Pod 自动扩缩容)。
    enabled: true                   # 启用或禁用 metrics-server。
  monitoring:
    storageClass: ""                 # 如果需要为 Prometheus 指定独立的 StorageClass,可以在此处指定。默认使用默认的 StorageClass。
    node_exporter:
      port: 9100
      # resources: {}
    # kube_rbac_proxy:
    #   resources: {}
    # kube_state_metrics:
    #   resources: {}
    prometheus:
      replicas: 2  # Prometheus 副本负责监控数据源的不同分段并提供高可用性。
      volumeSize: 200Gi  # Prometheus PVC 大小。
      resources:
        requests:
          memory: "1Gi"
          cpu: "500m"
        limits:
          memory: "4Gi"
          cpu: "2"
    #   operator:
    #     resources: {}
    alertmanager:
      replicas: 2          # AlertManager 副本数。
      resources:
        requests:
          memory: "500Mi"
          cpu: "500m"
        limits:
          memory: "2Gi"
          cpu: "1"
    notification_manager:
      resources:
        requests:
          memory: "500Mi"
          cpu: "500m"
        limits:
          memory: "2Gi"
          cpu: "1"
    #   operator:
    #     resources: {}
    #   proxy:
    #   resources: {}
    gpu:                           # GPU 监控相关插件安装。
      nvidia_dcgm_exporter:        # 确保主机上的 GPU 资源可以正常使用,否则此插件将无法正常工作。
        enabled: false           # 检查 GPU 主机上的标签是否包含 "nvidia.com/gpu.present=true",以确保 DCGM pod 被调度到这些节点。
        # resources: {}
  multicluster:
    clusterRole: none  # host | member | none  # 可以安装独立集群,或将其指定为主集群或成员集群。
  network:
    networkpolicy: # 网络策略允许在同一集群内进行网络隔离,这意味着可以在某些实例(Pod)之间设置防火墙。
      # 确保集群使用的 CNI 网络插件支持 NetworkPolicy。有许多 CNI 网络插件支持 NetworkPolicy,包括 Calico、Cilium、Kube-router、Romana 和 Weave Net。
      enabled: true # 启用或禁用网络策略。
    ippool: # 使用 Pod IP 池管理 Pod 网络地址空间。要创建的 Pod 可以从 Pod IP 池分配 IP 地址。
      type: calico # 如果使用 Calico 作为 CNI 插件,请为此字段指定 "calico"。"none" 表示禁用 Pod IP 池。
    topology: # 使用服务拓扑基于 Weave Scope 查看服务到服务的通信。
      type: weave-scope # 为此字段指定 "weave-scope" 以启用服务拓扑。"none" 表示禁用服务拓扑。
  openpitrix: # 一个对所有平台租户可访问的应用商店。您可以使用它来管理应用程序的整个生命周期。
    store:
      enabled: true # 启用或禁用 KubeSphere 应用商店。
  servicemesh:         # (0.3 核, 300 MiB) 提供细粒度的流量管理、可观测性和追踪,以及可视化的流量拓扑。
    enabled: true     # 基础组件(pilot)。启用或禁用 KubeSphere 服务网格(基于 Istio)。
    istio:  # 自定义 istio 安装配置,参考 https://istio.io/latest/docs/setup/additional-setup/customize-installation/
      components:
        ingressGateways:
        - name: istio-ingressgateway
          enabled: true
        cni:
          enabled: false
  edgeruntime:          # 将边缘节点添加到集群并在边缘节点上部署工作负载。
    enabled: true
    kubeedge:        # kubeedge 配置
      enabled: true
      cloudCore:
        cloudHub:
          advertiseAddress: # 必须提供至少一个公共 IP 地址或边缘节点可以访问的 IP 地址。
            - "192.168.198.51"            # 请注意,一旦启用 KubeEdge,如果不提供地址,CloudCore 将出现故障。
        service:
          cloudhubNodePort: "30000"
          cloudhubQuicNodePort: "30001"
          cloudhubHttpsNodePort: "30002"
          cloudstreamNodePort: "30003"
          tunnelNodePort: "30004"
        # resources: {}
        # hostNetWork: false
      iptables-manager:
        enabled: true
        mode: "external"
        # resources: {}
      # edgeService:
      #   resources: {}
  gatekeeper:        # 提供准入策略和规则管理,一个强制执行由 Open Policy Agent 执行的基于 CRD 的策略的验证(变异 TBA)webhook。
    enabled: false   # 启用或禁用 Gatekeeper。
    # controller_manager:
    #   resources: {}
    # audit:
    #   resources: {}
  terminal:
    # image: 'alpine:3.15' # 镜像中必须包含 nsenter 程序
timeout: 600 # 容器超时时间,如果设置为 0,则不使用超时。单位是秒。apiVersion:安装器 API 版本(固定写法)。
kind:资源类型,固定为
ClusterConfiguration。
metadata.name:默认
ks-installer,无需修改。
metadata.namespace:安装器运行的命名空间,通常为
kubesphere-system。
labels.version:标识 KubeSphere 版本(如
v3.4.1)。
💡 最佳实践:
提前规划存储类(StorageClass),避免 PVC Pending。
多集群环境必须统一
jwtSecret。
2. etcd 配置
etcd:
  monitoring: true
  endpointIps: 192.168.233.246
  port: 2379
  tlsEnable: true
  caFile: "/etc/prometheus/secrets/kube-etcd-client-certs/etcd-client-ca.crt"
  certFile: "/etc/prometheus/secrets/kube-etcd-client-certs/etcd-client.crt"
keyFile: "/etc/prometheus/secrets/kube-etcd-client-certs/etcd-client.key"monitoring:是否启用 etcd 监控(需提前配置 Secret)。
endpointIps:etcd 节点 IP,可多个,逗号分隔。
port:etcd 通信端口,默认 2379。
tlsEnable:启用 TLS 通信,生产强烈建议。
📌 注意:
单节点 etcd 适合测试环境;生产建议 3 或 5 节点高可用。
若 etcd 由外部独立部署,可直接填写外部地址。
3. 核心服务
common:
  core:
    console:
      enableMultiLogin: true
      port: 30880
type: NodePortconsole:控制台配置
enableMultiLogin:是否允许账号多地同时登录。port:默认 30880,通过 NodePort 方式暴露。
apiserver:
  resources:
    requests:
      memory: "1Gi"
      cpu: "500m"
    limits:
      memory: "4Gi"
cpu: "2"apiserver:API Server 资源限制,需根据集群规模调整。
controllerManager:控制器资源限制,配置方式类似。
📌 建议:
小集群保持默认,大规模集群适当调大。
可以为 console 改用 Ingress 暴露,而非 NodePort。
四、内置组件
1. 存储与缓存
Redis:默认启用,单副本(
enableHA: false),PVC 2Gi。OpenLDAP:默认启用,存储用户信息,PVC 2Gi。
Minio:对象存储(如日志、流水线 artifact),PVC 20Gi。
2. 监控与日志
Monitoring (Prometheus):默认启用,负责集群监控。
Elasticsearch (ES):默认启用,存储日志,保留 7 天。
Opensearch:可替代 ES,支持日志、事件、审计。
3. 系统功能
Alerting:启用,支持自定义告警规则。
Auditing:启用,记录用户操作。
DevOps (Jenkins):默认关闭,开启后可用 CI/CD。
Events:启用,事件可视化和告警。
Logging:启用,集中日志查询。
Metrics Server:启用,支持 HPA 自动扩缩容。
📌 建议:
若企业已有 ELK/Opensearch/Prometheus,可禁用内置组件,直接集成外部。
Minio 可替换为 AWS S3、Ceph RGW、阿里云 OSS。
五、集群与网络
multicluster:
clusterRole: noneclusterRole:
host:主集群member:成员集群none:单集群模式
network:
  networkpolicy:
    enabled: false
  ippool:
    type: calico
  topology:
type: nonenetworkpolicy:是否启用网络隔离策略(需 Calico/Cilium 支持)。
ippool:Pod IP 池管理方式,默认
calico。topology:服务拓扑展示,支持
weave-scope。
六、应用与服务治理
OpenPitrix:KubeSphere 应用商店,默认启用。
Service Mesh (Istio):默认关闭,提供流量治理、可观测性。
EdgeRuntime (KubeEdge):默认关闭,边缘计算场景可开启。
Gatekeeper (OPA):默认关闭,合规需求可启用。
Terminal:Web 终端,默认超时 600 秒,可设为 0 表示无限制。
七、外部组件集成
KubeSphere 内置了监控、日志、对象存储等组件,但在生产中通常更倾向于复用企业已有系统。
1. 外部 Prometheus
spec:
  common:
    monitoring:
      type: external
      endpoint: http://prometheus.example.com:9090
设置
type: external,禁用内置 Prometheus。endpoint填写外部 Prometheus 地址。
📌 注意:外部 Prometheus 需包含 Kubernetes 监控指标(node_exporter、kube-state-metrics)。
2. 外部 Elasticsearch
spec:
  common:
    es:
      enabled: false
      externalElasticsearchHost: "es.example.com"
      externalElasticsearchPort: "9200"
      basicAuth:
        enabled: true
        username: "elastic"
        password: "changeme"
关闭内置 ES(
enabled: false)。配置外部 Elasticsearch 地址和认证。
📌 注意:外部 ES 需支持索引创建权限,版本最好 7.x/8.x。
3. 外部 Opensearch
spec:
  common:
    opensearch:
      enabled: false
      externalOpensearchHost: "opensearch.example.com"
      externalOpensearchPort: "9200"
      basicAuth:
        enabled: true
        username: "admin"
        password: "changeme"
关闭内置 Opensearch。
对接外部 Opensearch。
4. 外部对象存储
默认内置 Minio,但生产推荐替换为:
AWS S3
Ceph RGW
阿里云 OSS
通过配置 StorageClass 或修改 Minio 相关配置实现。
八、本地化部署
1. 准备离线镜像
如果你的网络环境比较良好,那么可以不用使用我准备的离线包
准备离线镜像文件目录
kubesphere-images
[root@k8s-master1 kubesphere-images]# ls
data  docker-compose.yml
启动 registry 作为镜像仓库
[root@k8s-master1 images]# cat docker-compose.yml
services:
  registry:
    privileged: true     #这里把权限配置成true
    image: registry      #镜像来源
    restart: always      #开机后自己启动
    container_name: registry   #自定义服务名
    ports:               #暴露端口
      - 5000:5000
    volumes:            #挂载目录配置
      - ./data:/var/lib/registry
  web:
    image: konradkleine/docker-registry-frontend:v2
    restart: always
    ports:
      - 8035:80
    environment:
      - ENV_DOCKER_REGISTRY_HOST=192.168.198.51
      - ENV_DOCKER_REGISTRY_PORT=5000

[root@k8s-master1 images]# docker-compose up -d
[+] Running 2/0
 ✔ Container registry      Running                                                                                                                                           0.0s
 ✔ Container images-web-1  Running                                                                                                                                           0.0s
2. 准备存储类
[root@k8s-master1 kubesphere]# kubectl get sc
NAME                      PROVISIONER        RECLAIMPOLICY   VOLUMEBINDINGMODE      ALLOWVOLUMEEXPANSION   AGE
nfs-provisioner-storage   example.com/nfs    Delete          Immediate              false                  99m
openebs-hostpath          openebs.io/local   Delete          WaitForFirstConsumer   false                  134m
3. 安装部署
[root@k8s-master1 kubesphere]# ls
cluster-configuration.yaml  ingress.yaml  kubesphere-installer.yaml  etcd-endpoints.yaml
2.1 配置文件
apiVersion: installer.kubesphere.io/v1alpha1
kind: ClusterConfiguration
metadata:
  name: ks-installer
  namespace: kubesphere-system
  labels:
    version: v3.4.1
spec:
  persistence:
    storageClass: "nfs-provisioner-storage"        # 如果集群中没有默认的 StorageClass,需要在这里指定一个已存在的 StorageClass。
  authentication:
    adminPassword: "P@88w0rd"     # 管理员用户的自定义密码。如果参数存在但值为空,则会随机生成密码;如果参数不存在,则默认使用 P@88w0rd。
    jwtSecret: ""           # 必须保持与主集群的 jwtSecret 一致。可通过以下命令获取:kubectl -n kubesphere-system get cm kubesphere-config -o yaml | grep -v "apiVersion" | grep jwtSecret
  local_registry: "192.168.198.51:5000"        # 如果需要,可在此处添加私有镜像仓库地址。
#  dev_tag: ""               # 指定要安装的 KubeSphere 镜像标签,默认与 ks-installer 的版本一致。
  etcd:
    monitoring: true       # 启用或禁用 etcd 监控仪表板安装。启用前必须先为 etcd 创建 Secret。
    endpointIps: "192.168.198.51"  # etcd 集群端点 IP 地址。可以在此处填写多个 IP。
    port: 2379              # etcd 端口。
    tlsEnable: true
    caFile: "/etc/prometheus/secrets/kube-etcd-client-certs/etcd-client-ca.crt"
    certFile: "/etc/prometheus/secrets/kube-etcd-client-certs/etcd-client.crt"
    keyFile: "/etc/prometheus/secrets/kube-etcd-client-certs/etcd-client.key"
  common:
    core:
      console:
        enableMultiLogin: true  # 启用或禁用同时登录。它允许不同用户同时使用同一账户登录。
        port: 30880
        type: NodePort
      apiserver:            # 为大型集群扩大 apiserver 和 controller manager 的资源请求和限制
        resources:
          requests:
            memory: "1Gi"
            cpu: "500m"
          limits:
            memory: "4Gi"
            cpu: "2"
      controllerManager:
        resources:
          requests:
            memory: "1Gi"
            cpu: "500m"
          limits:
            memory: "4Gi"
            cpu: "2"
    redis:
      enabled: true
      enableHA: false
      volumeSize: 100Gi # Redis PVC 大小。
    openldap:
      enabled: true
      volumeSize: 20Gi   # openldap PVC 大小。
    minio:
      volumeSize: 200Gi # Minio PVC 大小。
    monitoring:
      #type: external   # 是否指定外部 prometheus 堆栈,需要在下一行修改端点。
      endpoint: http://prometheus-operated.kubesphere-monitoring-system.svc:9090 # 用于获取指标数据的 Prometheus 端点。
      GPUMonitoring:     # 启用或禁用 GPU 相关指标。如果启用此开关但没有 GPU 资源,Kubesphere 会将其设置为零。
        enabled: false
    gpu:                 # 安装 GPU 种类。默认 GPU 种类是 nvidia.com/gpu。可以根据需要在此处添加其他 GPU 种类。
      kinds:
      - resourceName: "nvidia.com/gpu"
        resourceType: "GPU"
        default: true
    es:   # 用于日志记录、事件和审计的存储后端。
      # master:
      #   volumeSize: 4Gi  # Elasticsearch 主节点的卷大小。
      #   replicas: 1      # 主节点总数。不允许偶数。
      #   resources: {}
      # data:
      #   volumeSize: 20Gi  # Elasticsearch 数据节点的卷大小。
      #   replicas: 1       # 数据节点总数。
      #   resources: {}
      enabled: false
      logMaxAge: 7             # 内置 Elasticsearch 中的日志保留时间。默认为 7 天。
      elkPrefix: logstash      # 构成索引名称的字符串。索引名称将格式化为 ks-<elk_prefix>-log。
      basicAuth:
        enabled: false
        username: ""
        password: ""
      externalElasticsearchHost: ""
      externalElasticsearchPort: ""
    opensearch:   # 用于日志记录、事件和审计的存储后端。
      # master:
      #   volumeSize: 4Gi  # Opensearch 主节点的卷大小。
      #   replicas: 1      # 主节点总数。不允许偶数。
      #   resources: {}
      # data:
      #   volumeSize: 20Gi  # Opensearch 数据节点的卷大小。
      #   replicas: 1       # 数据节点总数。
      #   resources: {}
      enabled: true
      logMaxAge: 7             # 内置 Opensearch 中的日志保留时间。默认为 7 天。
      opensearchPrefix: whizard      # 构成索引名称的字符串。索引名称将格式化为 ks-<opensearchPrefix>-logging。
      basicAuth:
        enabled: true
        username: "admin"
        password: "admin"
      externalOpensearchHost: ""
      externalOpensearchPort: ""
      dashboard:
        enabled: true
  alerting:                # (CPU: 0.1 核, 内存: 100 MiB) 使用户能够自定义告警策略,以不同的时间间隔和告警级别及时向接收器发送消息。
    enabled: true         # 启用或禁用 KubeSphere 告警系统。
    # thanosruler:
    #   replicas: 1
    #   resources: {}
  auditing:                # 提供与安全相关的按时间顺序的记录集,记录平台上由不同租户发起的一系列活动。
    enabled: true         # 启用或禁用 KubeSphere 审计日志系统。
    # operator:
    #   resources: {}
    # webhook:
    #   resources: {}
  devops:                  # (CPU: 0.47 核, 内存: 8.6 G) 提供基于 Jenkins 的开箱即用 CI/CD 系统,以及包括 Source-to-Image 和 Binary-to-Image 的自动化工作流工具。
    enabled: true         # 启用或禁用 KubeSphere DevOps 系统。
    jenkinsCpuReq: 0.5
    jenkinsCpuLim: 4
    jenkinsMemoryReq: 6Gi
    jenkinsMemoryLim: 6Gi  # 建议与 requests.memory 保持一致。
    jenkinsVolumeSize: 160Gi
  events:                  # 为多租户 Kubernetes 集群中的 Kubernetes 事件导出、过滤和告警提供图形化 Web 控制台。
    enabled: true         # 启用或禁用 KubeSphere 事件系统。
    # operator:
    #   resources: {}
    # exporter:
    #   resources: {}
    ruler:
      enabled: true
      replicas: 2
    #   resources: {}
  logging:                 # (CPU: 57 m, 内存: 2.76 G) 在统一控制台中提供灵活的日志查询、收集和管理功能。可以添加其他日志收集器,如 Elasticsearch、Kafka 和 Fluentd。
    enabled: true         # 启用或禁用 KubeSphere 日志系统。
    containerruntime: docker
    logsidecar:
      enabled: true
      replicas: 2
      # resources: {}
  metrics_server:                    # (CPU: 56 m, 内存: 44.35 MiB) 启用 HPA(水平 Pod 自动扩缩容)。
    enabled: true                   # 启用或禁用 metrics-server。
  monitoring:
    storageClass: ""                 # 如果需要为 Prometheus 指定独立的 StorageClass,可以在此处指定。默认使用默认的 StorageClass。
    node_exporter:
      port: 9100
      # resources: {}
    # kube_rbac_proxy:
    #   resources: {}
    # kube_state_metrics:
    #   resources: {}
    prometheus:
      replicas: 2  # Prometheus 副本负责监控数据源的不同分段并提供高可用性。
      volumeSize: 200Gi  # Prometheus PVC 大小。
      resources:
        requests:
          memory: "1Gi"
          cpu: "500m"
        limits:
          memory: "4Gi"
          cpu: "2"
    #   operator:
    #     resources: {}
    alertmanager:
      replicas: 2          # AlertManager 副本数。
      resources:
        requests:
          memory: "500Mi"
          cpu: "500m"
        limits:
          memory: "2Gi"
          cpu: "1"
    notification_manager:
      resources:
        requests:
          memory: "500Mi"
          cpu: "500m"
        limits:
          memory: "2Gi"
          cpu: "1"
    #   operator:
    #     resources: {}
    #   proxy:
    #   resources: {}
    gpu:                           # GPU 监控相关插件安装。
      nvidia_dcgm_exporter:        # 确保主机上的 GPU 资源可以正常使用,否则此插件将无法正常工作。
        enabled: false           # 检查 GPU 主机上的标签是否包含 "nvidia.com/gpu.present=true",以确保 DCGM pod 被调度到这些节点。
        # resources: {}
  multicluster:
    clusterRole: none  # host | member | none  # 可以安装独立集群,或将其指定为主集群或成员集群。
  network:
    networkpolicy: # 网络策略允许在同一集群内进行网络隔离,这意味着可以在某些实例(Pod)之间设置防火墙。
      # 确保集群使用的 CNI 网络插件支持 NetworkPolicy。有许多 CNI 网络插件支持 NetworkPolicy,包括 Calico、Cilium、Kube-router、Romana 和 Weave Net。
      enabled: true # 启用或禁用网络策略。
    ippool: # 使用 Pod IP 池管理 Pod 网络地址空间。要创建的 Pod 可以从 Pod IP 池分配 IP 地址。
      type: calico # 如果使用 Calico 作为 CNI 插件,请为此字段指定 "calico"。"none" 表示禁用 Pod IP 池。
    topology: # 使用服务拓扑基于 Weave Scope 查看服务到服务的通信。
      type: weave-scope # 为此字段指定 "weave-scope" 以启用服务拓扑。"none" 表示禁用服务拓扑。
  openpitrix: # 一个对所有平台租户可访问的应用商店。您可以使用它来管理应用程序的整个生命周期。
    store:
      enabled: true # 启用或禁用 KubeSphere 应用商店。
  servicemesh:         # (0.3 核, 300 MiB) 提供细粒度的流量管理、可观测性和追踪,以及可视化的流量拓扑。
    enabled: true     # 基础组件(pilot)。启用或禁用 KubeSphere 服务网格(基于 Istio)。
    istio:  # 自定义 istio 安装配置,参考 https://istio.io/latest/docs/setup/additional-setup/customize-installation/
      components:
        ingressGateways:
        - name: istio-ingressgateway
          enabled: true
        cni:
          enabled: false
  edgeruntime:          # 将边缘节点添加到集群并在边缘节点上部署工作负载。
    enabled: true
    kubeedge:        # kubeedge 配置
      enabled: true
      cloudCore:
        cloudHub:
          advertiseAddress: # 必须提供至少一个公共 IP 地址或边缘节点可以访问的 IP 地址。
            - "192.168.198.51"            # 请注意,一旦启用 KubeEdge,如果不提供地址,CloudCore 将出现故障。
        service:
          cloudhubNodePort: "30000"
          cloudhubQuicNodePort: "30001"
          cloudhubHttpsNodePort: "30002"
          cloudstreamNodePort: "30003"
          tunnelNodePort: "30004"
        # resources: {}
        # hostNetWork: false
      iptables-manager:
        enabled: true
        mode: "external"
        # resources: {}
      # edgeService:
      #   resources: {}
  gatekeeper:        # 提供准入策略和规则管理,一个强制执行由 Open Policy Agent 执行的基于 CRD 的策略的验证(变异 TBA)webhook。
    enabled: false   # 启用或禁用 Gatekeeper。
    # controller_manager:
    #   resources: {}
    # audit:
    #   resources: {}
  terminal:
    # image: 'alpine:3.15' # 镜像中必须包含 nsenter 程序
    timeout: 600         # 容器超时时间,如果设置为 0,则不使用超时。单位是秒。
2.2 ks-installer
---
apiVersion: apiextensions.k8s.io/v1
kind: CustomResourceDefinition
metadata:
  name: clusterconfigurations.installer.kubesphere.io
spec:
  group: installer.kubesphere.io
  versions:
    - name: v1alpha1
      served: true
      storage: true
      schema:
        openAPIV3Schema:
          type: object
          properties:
            spec:
              type: object
              x-kubernetes-preserve-unknown-fields: true
            status:
              type: object
              x-kubernetes-preserve-unknown-fields: true
  scope: Namespaced
  names:
    plural: clusterconfigurations
    singular: clusterconfiguration
    kind: ClusterConfiguration
    shortNames:
      - cc
---
apiVersion: v1
kind: Namespace
metadata:
  name: kubesphere-system
---
apiVersion: v1
kind: ServiceAccount
metadata:
  name: ks-installer
  namespace: kubesphere-system
---
apiVersion: rbac.authorization.k8s.io/v1
kind: ClusterRole
metadata:
  name: ks-installer
rules:
- apiGroups:
  - ""
  resources:
  - '*'
  verbs:
  - '*'
- apiGroups:
  - apps
  resources:
  - '*'
  verbs:
  - '*'
- apiGroups:
  - extensions
  resources:
  - '*'
  verbs:
  - '*'
- apiGroups:
  - batch
  resources:
  - '*'
  verbs:
  - '*'
- apiGroups:
  - rbac.authorization.k8s.io
  resources:
  - '*'
  verbs:
  - '*'
- apiGroups:
  - apiregistration.k8s.io
  resources:
  - '*'
  verbs:
  - '*'
- apiGroups:
  - apiextensions.k8s.io
  resources:
  - '*'
  verbs:
  - '*'
- apiGroups:
  - tenant.kubesphere.io
  resources:
  - '*'
  verbs:
  - '*'
- apiGroups:
  - certificates.k8s.io
  resources:
  - '*'
  verbs:
  - '*'
- apiGroups:
  - devops.kubesphere.io
  resources:
  - '*'
  verbs:
  - '*'
- apiGroups:
  - monitoring.coreos.com
  resources:
  - '*'
  verbs:
  - '*'
- apiGroups:
  - logging.kubesphere.io
  resources:
  - '*'
  verbs:
  - '*'
- apiGroups:
  - jaegertracing.io
  resources:
  - '*'
  verbs:
  - '*'
- apiGroups:
  - storage.k8s.io
  resources:
  - '*'
  verbs:
  - '*'
- apiGroups:
  - admissionregistration.k8s.io
  resources:
  - '*'
  verbs:
  - '*'
- apiGroups:
  - policy
  resources:
  - '*'
  verbs:
  - '*'
- apiGroups:
  - autoscaling
  resources:
  - '*'
  verbs:
  - '*'
- apiGroups:
  - networking.istio.io
  resources:
  - '*'
  verbs:
  - '*'
- apiGroups:
  - config.istio.io
  resources:
  - '*'
  verbs:
  - '*'
- apiGroups:
  - iam.kubesphere.io
  resources:
  - '*'
  verbs:
  - '*'
- apiGroups:
  - notification.kubesphere.io
  resources:
  - '*'
  verbs:
  - '*'
- apiGroups:
  - auditing.kubesphere.io
  resources:
  - '*'
  verbs:
  - '*'
- apiGroups:
  - events.kubesphere.io
  resources:
  - '*'
  verbs:
  - '*'
- apiGroups:
  - core.kubefed.io
  resources:
  - '*'
  verbs:
  - '*'
- apiGroups:
  - installer.kubesphere.io
  resources:
  - '*'
  verbs:
  - '*'
- apiGroups:
  - storage.kubesphere.io
  resources:
  - '*'
  verbs:
  - '*'
- apiGroups:
  - security.istio.io
  resources:
  - '*'
  verbs:
  - '*'
- apiGroups:
  - monitoring.kiali.io
  resources:
  - '*'
  verbs:
  - '*'
- apiGroups:
  - kiali.io
  resources:
  - '*'
  verbs:
  - '*'
- apiGroups:
  - networking.k8s.io
  resources:
  - '*'
  verbs:
  - '*'
- apiGroups:
  - edgeruntime.kubesphere.io
  resources:
  - '*'
  verbs:
  - '*'
- apiGroups:
  - types.kubefed.io
  resources:
  - '*'
  verbs:
  - '*'
- apiGroups:
  - monitoring.kubesphere.io
  resources:
  - '*'
  verbs:
  - '*'
- apiGroups:
  - application.kubesphere.io
  resources:
  - '*'
  verbs:
  - '*'
- apiGroups:
  - alerting.kubesphere.io
  resources:
  - '*'
  verbs:
  - '*'
---
kind: ClusterRoleBinding
apiVersion: rbac.authorization.k8s.io/v1
metadata:
  name: ks-installer
subjects:
- kind: ServiceAccount
  name: ks-installer
  namespace: kubesphere-system
roleRef:
  kind: ClusterRole
  name: ks-installer
  apiGroup: rbac.authorization.k8s.io
---
apiVersion: apps/v1
kind: Deployment
metadata:
  name: ks-installer
  namespace: kubesphere-system
  labels:
    app: ks-installer
spec:
  replicas: 1
  selector:
    matchLabels:
      app: ks-installer
  template:
    metadata:
      labels:
        app: ks-installer
    spec:
      serviceAccountName: ks-installer
      containers:
      - name: installer
        image: kubesphere/ks-installer:v3.4.1
        imagePullPolicy: "IfNotPresent"
        resources:
          limits:
            cpu: "1"
            memory: 1Gi
          requests:
            cpu: 20m
            memory: 100Mi
        volumeMounts:
        - mountPath: /etc/localtime
          name: host-time
          readOnly: true
      volumes:
      - hostPath:
          path: /etc/localtime
          type: ""
        name: host-time
2.3 ingress 访问
apiVersion: networking.k8s.io/v1
kind: Ingress
metadata:
  name: ks-console-ingress
  namespace: kubesphere-system
  annotations:
    # 正则表达式来匹配路径
    nginx.ingress.kubernetes.io/use-regex: "true"
    # 设置为"0"表示没有限制请求体的大小
    nginx.ingress.kubernetes.io/proxy-body-size: "0"
spec:
  ingressClassName: nginx
  tls:
    - hosts:
        - kubesphere.tianxiang.love
      secretName: kubesphere-tls-secret
  rules:
  - host: kubesphere.tianxiang.love
    http:
      paths:
      - pathType: Prefix
        path: "/"
        backend:
          service:
            name: ks-console
            port:
              number: 80
2.3 etcd endpoints
apiVersion: v1
kind: Endpoints
metadata:
  labels:
    app.kubernetes.io/name: etcd
  name: etcd
  namespace: kube-system
subsets:
- addresses:
  - ip: 192.168.198.51
  ports:
  - name: metrics
    port: 2379
    protocol: TCP
2.4 安装 helm
$ curl https://raw.githubusercontent.com/helm/helm/main/scripts/get-helm-3 | bash
$ source <(kubectl completion bash)
$ source <(helm completion bash)
# 永久:
$ echo "source <(kubectl completion bash)" >> ~/.bashrc
$ helm completion bash > /etc/bash_completion.d/helm
2.5 部署提交
$ kubectl create ns kubesphere-monitoring-system
$ kubectl apply -f etcd-endpoints.yaml
$ kubectl -n kubesphere-monitoring-system create secret generic kube-etcd-client-certs \
--from-file=etcd-client-ca.crt=/etc/kubernetes/pki/etcd/ca.crt \
--from-file=etcd-client.crt=/etc/kubernetes/pki/etcd/healthcheck-client.crt \
--from-file=etcd-client.key=/etc/kubernetes/pki/etcd/healthcheck-client.key
$ kubectl apply -f kubesphere-installer.yaml
$ kubectl apply -f cluster-configuration.yaml
$ kubectl apply -f ingress.yaml4. 查看日志
基本上遇到最多的就是镜像无法下载,这种问题也容易解决,想办法把镜像弄到本地即可
$ kubectl -n kubesphere-system logs -l app=ks-installer -f
$ kubectl -n kubesphere-system logs -l app=ks-installer -f
PLAY RECAP *********************************************************************
localhost : ok=25 changed=19 unreachable=0 failed=0 skipped=22 rescued=0 ignored=0
Start installing monitoring
Start installing multicluster
Start installing openpitrix
Start installing network
Start installing alerting
Start installing auditing
Start installing events
Start installing logging
**************************************************
Waiting for all tasks to be completed ...
task alerting status is successful (1/8)
task network status is successful (2/8)
task auditing status is successful (3/8)
task events status is successful (4/8)
task multicluster status is successful (5/8)
task logging status is successful (6/8)
task openpitrix status is successful (7/8)
task monitoring status is successful (8/8)
**************************************************
Collecting installation results ...
#####################################################
### Welcome to KubeSphere! ###
#####################################################
Console: http://192.168.233.246:30880
Account: admin
Password: Tian18332825309.
NOTES:
1. After you log into the console, please check the
monitoring status of service components in
"Cluster Management". If any service is not
ready, please wait patiently until all components
are up and running.
2. Please change the default password after login.
#####################################################
https://kubesphere.io 2025-09-09 17:08:34
#####################################################5. 挂载 etcd 证书到 Prometheus
由于 Prometheus 是由 operator 控制的 所以不能以传统方式 edit 编辑修改 statefulset
所以我们要修改 operator
$ kubectl edit prometheuses -n kubesphere-monitoring-system

  secrets:
  - kube-etcd-client-certs  # 这个就是你创建的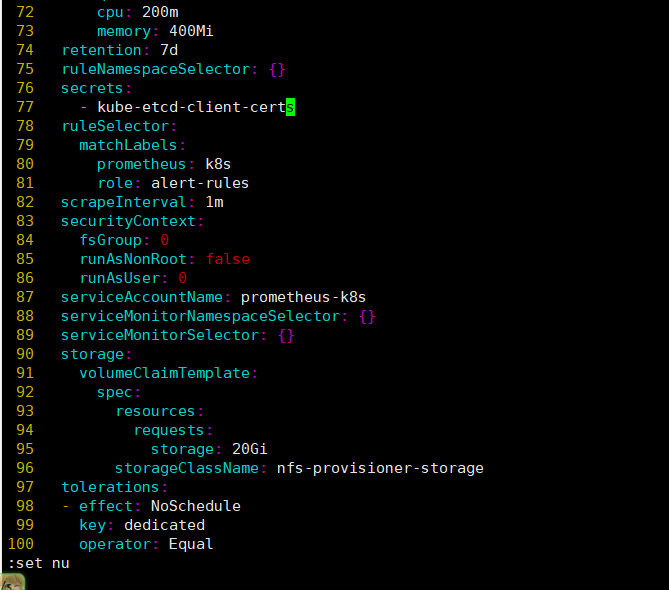
检查容器中已经存在证书
$ kubectl -n kubesphere-monitoring-system exec -it prometheus-k8s-0 -- ls -lh /etc/prometheus/secrets/kube-etcd-client-certs
total 0
lrwxrwxrwx    1 root     root          25 Sep 16 08:30 etcd-client-ca.crt -> ..data/etcd-client-ca.crt
lrwxrwxrwx    1 root     root          22 Sep 16 08:30 etcd-client.crt -> ..data/etcd-client.crt
lrwxrwxrwx    1 root     root          22 Sep 16 08:30 etcd-client.key -> ..data/etcd-client.key
6. dev-ops 无法启动
查看 helm 状态发现失败
$ helm -n kubesphere-devops-system list
NAME  	NAMESPACE               	REVISION	UPDATED                                	STATUS	CHART          	APP VERSION
devops	kubesphere-devops-system	4       	2025-09-16 18:43:35.063268926 +0800 CST	failed	ks-devops-0.2.2	v3.4.2
查看 helm 历史记录,发现提到了一个证书到期
到期时间为 2024-02-14T06:08:48
$ helm history devops -n kubesphere-devops-system
REVISION	UPDATED                 	STATUS  	CHART          	APP VERSION	DESCRIPTION
1       	Tue Sep 16 18:41:09 2025	deployed	ks-devops-0.2.2	v3.4.2     	Install complete
2       	Tue Sep 16 18:42:35 2025	failed  	ks-devops-0.2.2	v3.4.2     	Upgrade "devops" failed: cannot patch "binary" with kind S2iBuilderTemplate: Internal error occurred: failed calling webhook "s2ibuildertemplate.kb.io": failed to call webhook: Post "https://webhook-server-service.kubesphere-devops-system.svc:443/validate-devops-kubesphere-io-v1alpha1-s2ibuildertemplate?timeout=10s": x509: certificate has expired or is not yet valid: current time 2025-09-16T10:42:40Z is after 2024-02-14T06:08:48Z
3       	Tue Sep 16 18:43:05 2025	failed  	ks-devops-0.2.2	v3.4.2     	Upgrade "devops" failed: cannot patch "binary" with kind S2iBuilderTemplate: Internal error occurred: failed calling webhook "s2ibuildertemplate.kb.io": failed to call webhook: Post "https://webhook-server-service.kubesphere-devops-system.svc:443/validate-devops-kubesphere-io-v1alpha1-s2ibuildertemplate?timeout=10s": x509: certificate has expired or is not yet valid: current time 2025-09-16T10:43:10Z is after 2024-02-14T06:08:48Z
4       	Tue Sep 16 18:43:35 2025	failed  	ks-devops-0.2.2	v3.4.2     	Upgrade "devops" failed: cannot patch "binary" with kind S2iBuilderTemplate: Internal error occurred: failed calling webhook "s2ibuildertemplate.kb.io": failed to call webhook: Post "https://webhook-server-service.kubesphere-devops-system.svc:443/validate-devops-kubesphere-io-v1alpha1-s2ibuildertemplate?timeout=10s": x509: certificate has expired or is not yet valid: current time 2025-09-16T10:43:40Z is after 2024-02-14T06:08:48Z
5.1 卸载 devops
此时卸载的目的就是先清理掉失败的 helm
$ helm uninstall -n kubesphere-devops-system devops5.2 修改 ks-installer 镜像
使用 v3.4.1-patch.0 镜像,此镜像可是帮助我们顺利度过 devops 安装阶段,使其不再报错
$ kubectl -n kubesphere-system patch deployments ks-installer --type='json' -p='[{"op": "replace", "path": "/spec/template/spec/containers/0/image", "value": "harbor.tianxiang.love:30443/kubesphere/ks-installer:v3.4.1-patch.0"}]'此时更新后 pod 会自动重启,在重启过程中就会再次跑一边流程,然后会成功拉起 devops 阶段
$ kubectl -n kubesphere-system get pod
NAME                                     READY   STATUS              RESTARTS        AGE
ks-apiserver-775cd87d9f-jxnzz            1/1     Running             0               4h36m
ks-console-77fccf4649-m8qfl              1/1     Running             0               4h36m
ks-controller-manager-5ffb4867d4-rwntl   1/1     Running             0               4h36m
ks-installer-6469bf6b8d-hlh8c            0/1     ContainerCreating   0               1s
minio-664555995c-k229z                   1/1     Running             0               4h39m
openldap-0                               1/1     Running             1 (4h38m ago)   4h39m
openpitrix-import-job-xgcrd              0/1     Completed           0               8m56s
redis-64db88c974-hdwd8                   1/1     Running             0               4h39m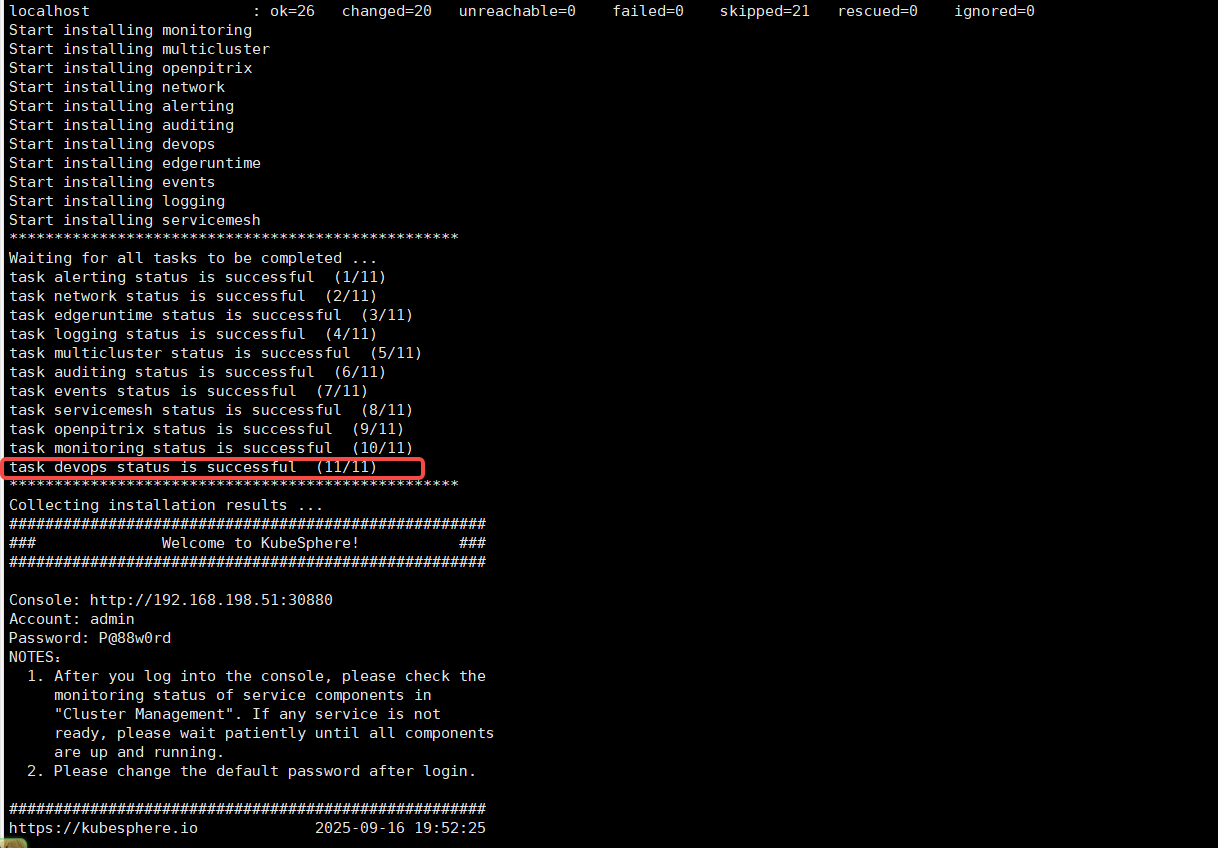
5.3 修改 s2ioperator 证书
上传证书到服务器进行更新替换
config 目录里面是已经签名好的证书,直接执行脚本就能替换,证书到期时间为:2051年7月8日04:28:31
$ ls
config  update-s2i-cert.sh
$ cat update-s2i-cert.sh
#!/bin/bash
set -e
CaBundle=$(< ./config/certs/ca.crt base64 -w 0)
TLSKey=$(< ./config/certs/server.key base64 -w 0)
TLSCrt=$(< ./config/certs/server.crt base64 -w 0)
echo "Update Secret: s2i-webhook-server-cert.."
kubectl -n kubesphere-devops-system patch secret s2i-webhook-server-cert --type='json' -p="[\
{\"op\": \"replace\", \"path\": \"/data/caBundle\", \"value\": \"${CaBundle}\"},\
{\"op\": \"replace\", \"path\": \"/data/tls.key\", \"value\": \"${TLSKey}\"},\
{\"op\": \"replace\", \"path\": \"/data/tls.crt\", \"value\": \"${TLSCrt}\"}\
]"
echo "Update ValidatingWebhookConfiguration validating-webhook-configuration.."
kubectl -n kubesphere-devops-system patch validatingwebhookconfigurations validating-webhook-configuration --type='json' -p="[\
{\"op\": \"replace\", \"path\": \"/webhooks/0/clientConfig/caBundle\", \"value\": \"${CaBundle}\"},\
{\"op\": \"replace\", \"path\": \"/webhooks/1/clientConfig/caBundle\", \"value\": \"${CaBundle}\"},\
{\"op\": \"replace\", \"path\": \"/webhooks/2/clientConfig/caBundle\", \"value\": \"${CaBundle}\"}\
]"
echo "Update MutatingWebhookConfiguration mutating-webhook-configuration.."
kubectl -n kubesphere-devops-system patch mutatingwebhookconfigurations mutating-webhook-configuration --type='json' -p="[{\"op\": \"replace\", \"path\": \"/webhooks/0/clientConfig/caBundle\", \"value\": \"${CaBundle}\"}]"
echo "Restart s2ioperator server.."
sleep 5
kubectl -n kubesphere-devops-system rollout restart sts s2ioperator
echo "Done."更新证书
$ bash update-s2i-cert.sh
Update Secret: s2i-webhook-server-cert..
secret/s2i-webhook-server-cert patched (no change)
Update ValidatingWebhookConfiguration validating-webhook-configuration..
validatingwebhookconfiguration.admissionregistration.k8s.io/validating-webhook-configuration patched (no change)
Update MutatingWebhookConfiguration mutating-webhook-configuration..
mutatingwebhookconfiguration.admissionregistration.k8s.io/mutating-webhook-configuration patched (no change)
Restart s2ioperator server..
statefulset.apps/s2ioperator restarted
Done.
使用如下脚本也可以自签名证书
$ cat cert.sh
#!/bin/bash

set -e

usage() {
    cat <<EOF
Generate certificate suitable for use with an sidecar-injector webhook service.
This script uses k8s' CertificateSigningRequest API to a generate a
certificate signed by k8s CA suitable for use with sidecar-injector webhook
services. This requires permissions to create and approve CSR. See
https://kubernetes.io/docs/tasks/tls/managing-tls-in-a-cluster for
detailed explantion and additional instructions.
The server key/cert k8s CA cert are stored in a k8s secret.
usage: ${0} [OPTIONS]
The following flags are required.
       --service          Service name of webhook.
       --namespace        Namespace where webhook service and secret reside.
EOF
    exit 1
}

while [[ $# -gt 0 ]]; do
    case ${1} in
        --service)
            service="$2"
            shift
            ;;
        --namespace)
            namespace="$2"
            shift
            ;;
        *)
            usage
            ;;
    esac
    shift
done

[ -z ${service} ] && service=webhook-service
[ -z ${namespace} ] && namespace=default

if [ ! -x "$(command -v openssl)" ]; then
    echo "openssl not found"
    exit 1
fi

csrName=${service}.${namespace}
CERTSDIR="config/certs"

if [ ! -d ${CERTSDIR} ]; then
  mkdir -p ${CERTSDIR}
fi

cat > v3.ext <<-EOF
authorityKeyIdentifier=keyid,issuer
basicConstraints=CA:FALSE
keyUsage = digitalSignature, nonRepudiation, keyEncipherment, dataEncipherment
extendedKeyUsage = serverAuth
subjectAltName = @alt_names
[alt_names]
DNS.1=${service}.${namespace}.svc
DNS.2=hostname
EOF

echo "creating certs in certsdir ${CERTSDIR} "

# create cakey
openssl genrsa -out ${CERTSDIR}/ca.key 2048

# create ca.crt
openssl req -x509 -new -nodes -key ${CERTSDIR}/ca.key -subj "/C=CN/ST=HB/O=QC/CN=${service}" -sha256 -days 10000 -out ${CERTSDIR}/ca.crt

# create server.key
openssl genrsa -out ${CERTSDIR}/server.key 2048

# create server.crt
openssl req -new -sha256 -key ${CERTSDIR}/server.key -subj "/C=CN/ST=HB/O=QC/CN=${service}.${namespace}.svc" -out ${CERTSDIR}/server.csr
openssl x509 -req -in ${CERTSDIR}/server.csr -extfile v3.ext -CA ${CERTSDIR}/ca.crt -CAkey ${CERTSDIR}/ca.key -CAcreateserial -out ${CERTSDIR}/server.crt -days 10000 -sha256
5.4 把 ks-installer 镜像回滚回去
$ kubectl -n kubesphere-system patch deployments ks-installer --type='json' -p='[{"op": "replace", "path": "/spec/template/spec/containers/0/image", "value": "harbor.tianxiang.love:30443/kubesphere/ks-installer:v3.4.1"}]'等待重启重新加载结束一切正常
参考文献:https://ask.kubesphere.com.cn/forum/d/22671-awsde-eskqi-yong-cha-jian-kubesphere-devopsyi-chang-namespaces-kubesphere-devops-worker-not-found/9
https://ask.kubesphere.com.cn/forum/d/23227-s2ifu-wu-bu-ke-yong-ti-shi-zheng-shu-shi-xiao/2
九、使用场景对比
十、已知问题
关于 opensearch 插件: 如果 dashboard 一开始部署的时候没有开启,那么后面想要打开的设置为 true,ks-installer 重新部署完后发现关于 opensearch 的 dashboard 并没有启动
解决办法:
先清空opensearch的状态,然后 重建 ks-installer即可
$ kubectl edit cc -n kubesphere-system ks-installer

status:
  opensearch:                           # 删除
    enabledTime: 2024-10-12T13:23:41CST # 删除
    status: enabled                     # 删除

$ kubectl rollout restart deploy -n kubesphere-system ks-installer

$ kubectl get pods -n kubesphere-logging-system -l app=opensearch-dashboards
NAME                                                          READY   STATUS    RESTARTS   AGE
opensearch-dashboard-opensearch-dashboards-65888c5fbc-slg7x   1/1     Running   0          5m11s
十一、总结
必改项:
adminPassword、storageClass、etcd.endpointIps。生产建议:
关闭不必要的内置组件,减少维护成本。
复用已有监控(Prometheus/Grafana)、日志(ELK/Opensearch)、存储(S3/Ceph)。
集群规模扩展:调优 API Server/ControllerManager 资源,合理规划 etcd。
多集群场景:统一
jwtSecret,设置clusterRole为host/member。